
THE FOLLOWING ARE SOME TIPS FOR ACHIEVING PROPER TECHNIQUE IN FLOURISHING. THESE ARE NOT INTENDED AS A SUBSTITUTE FOR FACE-TO-FACE INSTRUCTION, BUT MERELY AS A LEARNING AIDE. PLEASE ALSO NOTE THAT THERE ARE VERY FEW RULES IN FLOURISHING. I AM NOT ASSERTING THAT MY WAY IS THE ONLY CORRECT METHOD. I AM SIMPLY SHARING WHAT I HAVE FOUND TO WORK BEST IN MY EXPERIENCE.
TYING ON THE STRINGS: The method I prefer for tying the strings onto the sticks is with a clove hitch knot. With most types of strings, this knot is secure and will actually get tighter with flourishing, rather than looser, as with some knots. To tie on the string, make a loop in the string. Hold it secure with your left thumb and forefinger. Now with the other hand make another loop next to the first one.

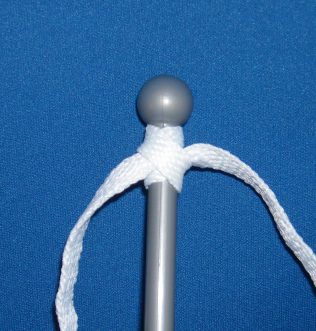
Place the second loop behind the first loop.

Place the stick through the two loops. Pull the ends of the string to tighten, and it should look like the photo below, with a diagonal across the middle. If your strings are flat rather than rounded, it is best to loosen the knot a bit and get any twists out of the string, then pull the knot tight.
To secure the other end, I prefer a knot that takes both ends around and through, so that the extra sticks out horizontally past the pinky finger. That way the knot and the extra ends of the laces are out of the way.

STRING LENGTH: Lace on your strings as you would to flourish, and then with your stick on your hand, extend your hand as if you were going to shake someone’s hand, fingers together, with the stick dangling on the back side of your hand. The stick should lift up from the back of the hand slightly, at about a 45 degree angle. If the stick hangs straight down, you have too much slack and will have difficulty catching your flourishes. If the stick stands out at a 90 degree angle parallel to the floor, you have not enough slack and will have trouble executing certain flourishes.
PUTTING THE STRINGS ON YOUR HANDS: I recommend (at least for practice purposes) no twists between the fingers. Loop the string on the pinky finger, then both of the laces go over the ring and middle fingers and then under the index finger. Securing the strings with twists between the fingers is in my opinion a detriment to learning proper control. Of course, when performing or competing, if you feel it necessary to twist the strings for security, by all means, do. But in practice, if you can learn to control the sticks laced on the way I describe, then you will be forced to learn excellent control. Twisting between the fingers will require more string length, so if you choose to play this way in performance, you will need separate sticks for practice so that each pair can have the proper length strings.
CATCHING THE STICKS: To catch, it is important that your strings are the correct length (see above). While flourishing, spread your fingers; this should make the bead end of the stick pop into the palm side of your hand at the base of the index finger, so that you can grasp it with your thumb and index finger. Once you accomplish this, work toward making the catch subtle, so that it is difficult to discern when you are actually catching.
TWISTING OF STRINGS: It is normal for your laces to twist up when you are learning. This indicates that your technique is not yet correct. Usually you are pushing too hard. When you achieve the proper technique and are able to relax and let the flourish flow, the twisting will stop. It is frustrating because you have to keep stopping and untwisting in order to practice, but just know that everyone deals with this.
For more help with basic technique, consider Tenor Tutor
![]()
Tenor Tutor is a digital download video instruction collection. For more information or to purchase, please click here.
